
jsrf-inside
JSRF-Inside
Exploring the art of Jet Set Radio Future, reverse engineering the game and modding.
46 posts
Don't wanna be here? Send us removal request.
Last Seen Blogs


Text
Creating levels for JSRF - an overview
Hey,
so for the past few months I have been working on the JSRF level compiler and also an add-on for Blender to export levels for JSRF, also the latest version of the JSRF Mod Tool processes and compiles the data into the game's level file format and boom! custom levels.
Once again huge thanks to Gurten, Daft, Demo, Fuse, Duck from the JSRF Reverse Engineering community & the Cxbx team who made this possible.
This post is an overview of the process, however I will not be covering the topic of the 3D modelling process since it would be too long to cover, it's a subject on it's own and there's already plenty of tutorials out there for Blender, the focus of this post is on how the JSRF levels work and the tools to create them.
Click here to download the JSRF Mod Tool and the Blender JSRF Stage exporter addon
In this zip file you will find a Blender scene file with a test level, the dev textures for the collision materials, the Blender JSRF Stage Exporter addon an the JSRF ModTool which compiles the level data exported from Blender, and lastly a Mission file which loads when you select "new game", the level will be empty, only corn is standing around, place this file in the "Media\Mission\" folder.
You can find the source code for the JSRF ModTool here
youtube
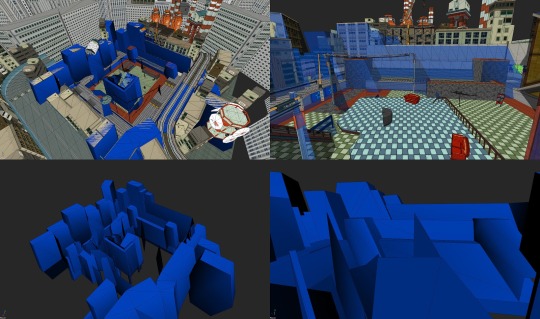
Composition of a JSRF level
A JSRF level is mainly composed of 3D models, of two kinds, one for the visuals that we see and uses textures (top left picture), and another, invisible in-game which is used for the physics simulation(top right pic) and how the player controller interacts with the environment's surfaces.
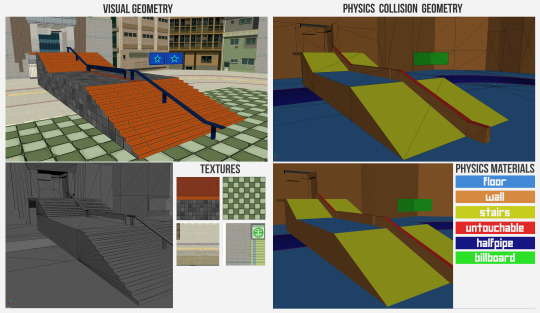
On the left the visual models, on the right the physics collision model, notice how the collision model has less detail, it's simplified, for instance the stairs become a flat ramp but in the game the yellow surfaces act as stairs and the character takes steps as if there were stairs.
The colors on the surfaces of the physics models help us recognize what type of physics material the faces of the model are assigned.
Lastly, the level also contains curves data for the rails we can grind in-game.
Setting up the Blender JSRF Stage Exporter
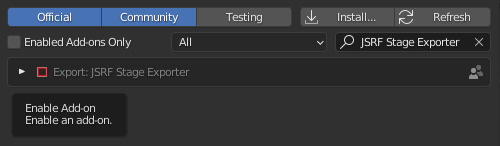
First let's install the JSRF Exporter addon for Blender, make sure you have downloaded the files, and have "JSRF_Stage_Exporter.py"
In Blender go to Edit >> Preferences >> Add-ons then click Install

Browse to and select "JSRF_Stage_exporter.py" and don't forget to tick the checkbox(highlighted in red here) to enable the add-on:
You can the find the JSRF Stage exporter menu at the bottom of the 'Scene' panel:
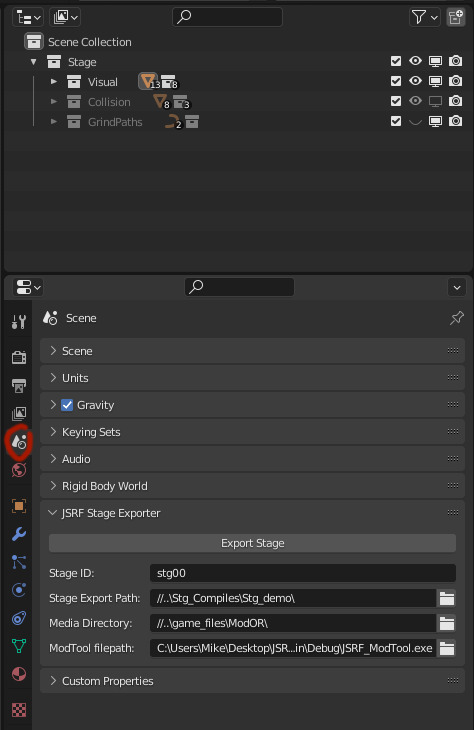
You will first need to setup the paths as follows:
Stage ID is the name of the stage it will be exported as in the Media\Stage\ directory
Stage Export Path is the folder where the Stage data will be exported
Media Directory should point to the JSRF Media folder
ModTool filepath should point to the JSRF_ModTool.exe
When you press Export Stage, the stage data from blender will be exported, then the JSRF ModTool will run and compile the stage (by default) as the Garage (stg00)
Creating the visual model & using it as a base for the collision
When start to make a level, we're not going to work on the fancy visuals, instead we roughly model the shape of the level and objects, assigning the physics materials as the default material/texture for the visual models since that's what we're going to use as temporary collision models.
So you'll want to assign the materials that come with the demo scene.
Here's what a test stage looks like:
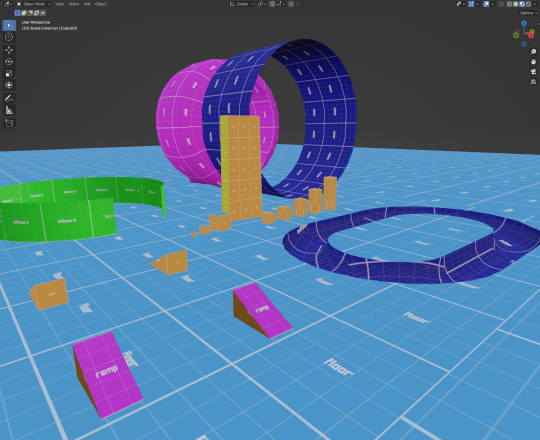
This is just a test map but that's all you need to know to get started making and testing levels for JSRF, if you're going to do the proper visuals.
You might want to use the old mod tool (download top right) to extract the game's models and textures to re-use them.
Here's what the scene in Blender should look like:
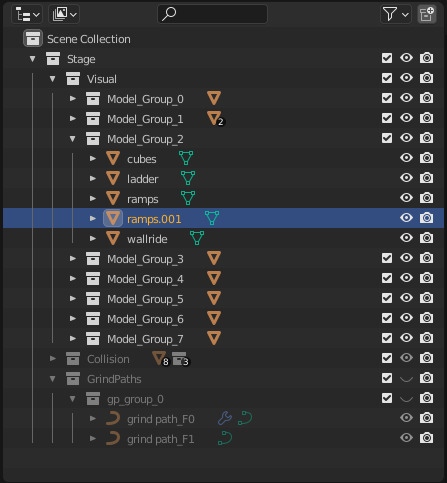
The main "Stage" collection contains "Visual" "Collision" and "GrindPaths", and the those three collections should contain other collections that contain the meshes, and curves for the GrindPaths collection, check how the demo scene is setup if you're not sure.
You must use this structure and naming (except for "Model_group_0" you can name those whatever you like, but avoid ".001 .002 etc trailing names") as that's how the JSRF Stage Exporter addon can process and export the level data.
Current limitation: a maximum of 8 model groups for the Visual collection, try to fit in all your visual meshes in those 8 model groups (until we figure out how the level graphics optimization data works to increase the maximum number of visual models)
As for collision models, you can have up to 1023 triangles per collision model group, that's just how the game engine works.
When you have blocked out your level's visual meshes(with the collision materials), as a shortcut you can copy paste the model groups from Visual collection into the Collision collection.
For a finished level the collision models should be modeled separately or you can use part of the visual models as a base, but the models should be simplified as much as possible, for instance, for a set of buildings as collision model, you wouldn't have multiple buildings/boxes for collision, but simply a big wall joining the ground with more or less the same scale as the buildings, in some cases it can be boxes or skewed shapes, in general just try to simplify as much as possible.
Limitations of JSRF's levels visual models
JSRF Level Visual models only support one UV per vertex, which means you have to treat the model so there aren't multiple UVs per vertex and you need to be very mindful about it, otherwise if you make a complex mesh and once compiled you see it in-game with messed up UVs, it might be tricky(in Blender) to find which part of the mesh is causing the issue.
Ok here's an example (the box in orange) of the issue and how it's solved:

Grind Paths
Grind paths can be created by extracting the edges of a mesh as curves, you then need to add them on the "GrindPaths" collection, inside it's own collection/group.
To extract edges as a curve, you can use the following addon, note: in the script change the version from "blender": (2, 80, 0), to whatever version of Blender you're using so it loads up.
In blender you'll find the button while in Edit mode (edges) right click and at the bottom "Edges to curve"
Note: right now bezier or other types of curves are not supported, or at least I don't know Blender well enough to tell you which type of curves the exporter would support, so try starting from extracting edges as a curve with the addon I just mentioned, unless you know a way to manually make "curves" that are just point to point without smoothing.
And... that's pretty much it, for now to get started, try using and modifying the Blender level demo scene provided.
25 notes
·
View notes
Video
youtube
So with the help of some people, we managed to create the first custom JSRF level!
Huge thanks to Gurten, Daft, Demo, Fuse, Duckfrom the JSRF reverse engineering community & the Cxbx team who made this possible.
30 notes
·
View notes
Video
Currently reverse engineering and coding tools in order to make creating custom JSRF levels possible, here's an example of a custom visual 3D model imported into the game.
Next up figuring out how to compile the physics collision models.
17 notes
·
View notes
Photo
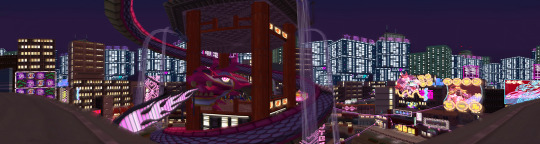
JSRF: 99th street panorama
63 notes
·
View notes
Photo
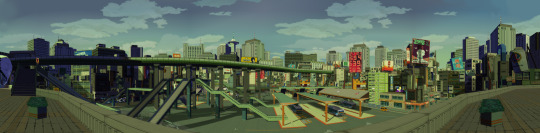
JSRF: Shibuya Terminal panorama
108 notes
·
View notes
Video
spread this so SEGA notices, PS: thank you :)
151 notes
·
View notes
Photo

I managed to remove the menu/displays and make the player model invisible in order to have a “camera” mode to take pictures and make some panoramas, here’s a little test.
36 notes
·
View notes
Video
Peter Griffin in JSRF
115 notes
·
View notes
Photo
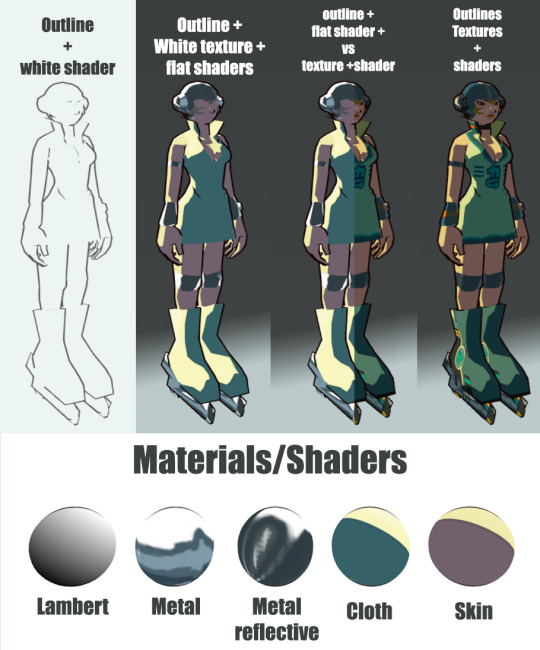
JSRF artstyle deconstructed, see the different shaders used to achieve the look.
158 notes
·
View notes
Text
JSRF - Artstyle analysis
Deconstructing the JSRF Artstyle
JSRF is known for its "cell-shaded" style, which is achieved through texture, shading, lighting as well as post-process screen effects.
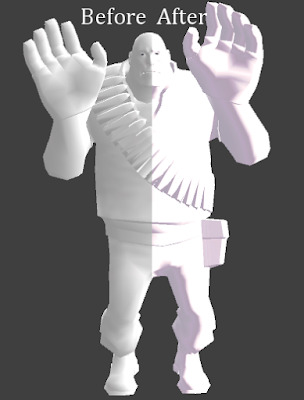
I believe JSRF uses a technique called lightwarp-shading, amongst other details such as the outline around characters.
The lightwarp shades the 3D model with a gradient of different brightness and color tones, here is a similar example as seen in the game Team Fortress 2, the right side showing the lightwarp shading.
TF2 pyro lightwarp:

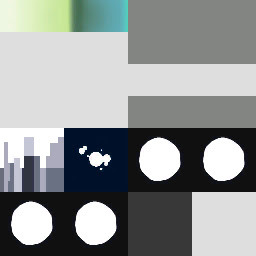
JSRF lightwarp:

This is the JSRF main lightwarp texture, actually the lightwarp in JSRF is stored in (the following) larger texture file which appears to have more images that are probably used to fake reflections and/or specular highlights.
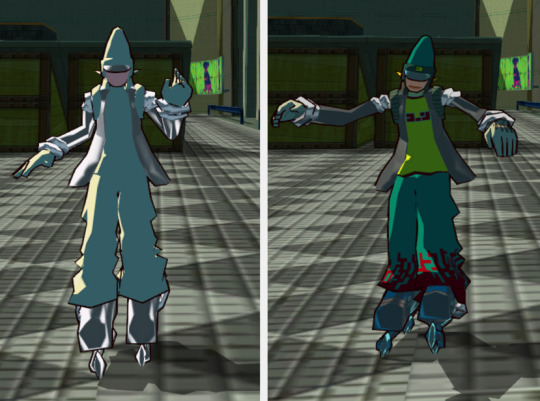
To get a better idea of how models are shaded, on the left image I have made the textures of the character Corn near white, so we can clearly distinguish some parts of the body have a different shading, color, reflectivity etc
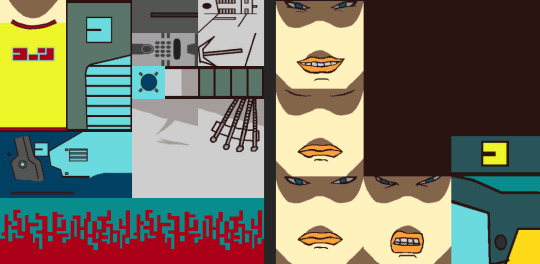
Here is what Corn's textures for the body and face/hat look like.
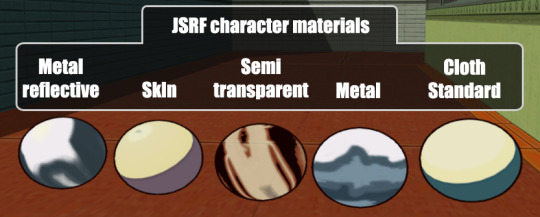
JSRF player models use various materials, to get a better look at the materials in the following picture I have turned the player model into spheres each with a different material.
Shadows
The game uses clever ways to handle shadows, real time shadows, pre-baked shadow volumes, flat mesh shadows and decal texture shadows.
Its unclear and I can only speculate on if the shadow techniques were chosen for performance optimization purposes and/or artistical choice, as for instance the level's shadows are simplified, that might have been deliberate to avoid visually noisy shadows that more realistic shadows would cause.
Let's go through the different types of shadows.
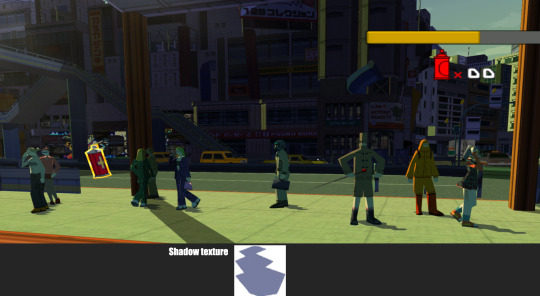
Decal casted shadows
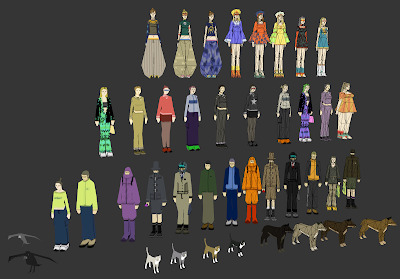
On average the level of detail for pedestrian models are all around 200 triangles per model.
The crowds of people in JSRF use a faked decal shadow that is projected over the floor and stretched/oriented depending on the direction of the sunlight and animation:
Real time shadows
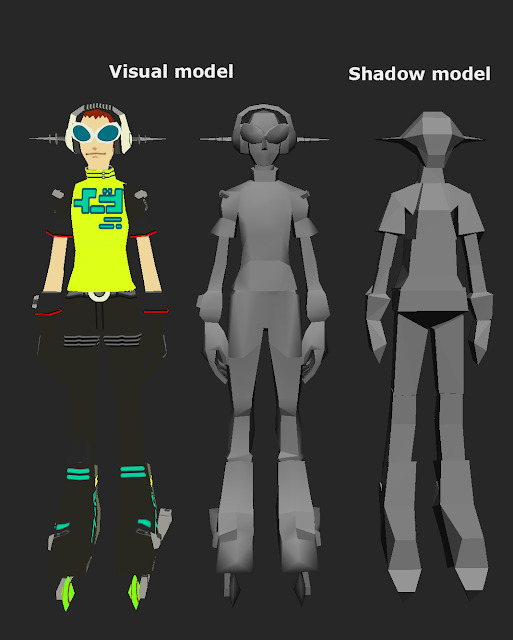
These are mainly used on playable characters and important character models or animated objects.
The player model file contains a simplified version of the visual model that is used to cast the shadow.

There's Yoyo, notice his shadow is a bit more "blocky" than the visual model. though this is not really noticeable while playing and a nice optimization.
Shadow volume meshes
For the levels, JSRF uses pre-baked aka pre-calculated shadow volumes.
3D models that are overlay-ed over the level's visual meshes, and tints the parts it covers or any moving object that goes inside it.
Its unclear if these were auto generated, or made manually, because these shadow volumes don't cover every detail that a light would cast, the shadow models are simplified.
Here's a preview of the Garage level with the pre-baked shadow volumes visible in blue.
Once again, this technique might have been chosen deliberately for performance optimization and/or for artstyle choices, much of the shadow detail is simplified with this technique and lends itself to a far less noisy and more readable environment than if every tiny shadow was cast for the smaller details.
I think that covers the main things and its only a little glimpse into of the many things that make this game a piece of art.
Well, that's it for now, I am sure more could be said about the game as it is full of details I might have glossed over, if so feel free to let me know and I can edit this post or make a second part.
73 notes
·
View notes
Video
Team Fortress 2 Scout meets JSRF
#jsrf#jsr jetsetradio jetsetradiofuture TF2 TeamFortress2 Scout#Jet Set Radio Future Team Fortress 2 scout
51 notes
·
View notes
Photo
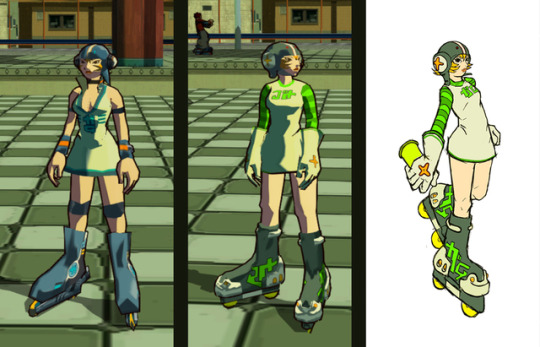
So I created a custom player model based on this concept of the classic JSR Gum character and imported it into JSRF
153 notes
·
View notes
Video
youtube
JSRF MOD: Peach
15 notes
·
View notes
Video
youtube
JSRF MOD: A.Ku.Mu boss as Bowser
12 notes
·
View notes
Video
youtube
JSRF Mod Mario star powerup
15 notes
·
View notes
Video
youtube
Sonic in JSRF (Work in progress)
23 notes
·
View notes
Video
youtube
Mario in JSRF, custom model importing, yes yes, I should make the cans be coins and the graffiti souls become stars.
33 notes
·
View notes