
daniel11ryan
Technology Aware
Daniel Ryan is a technical expert who writes about productivity suites such as
technical Antivirus.
222 posts
Don't wanna be here? Send us removal request.
Last Seen Blogs

lordofdorknessgundam
what do you mean, it's not 2013 anymore?


hecklin
slutty catholic boy just gave me a case of the gay

fyhbb
Untitled

hotcoffeewextracream
Hot Coffee W/ Cream pt. 2
Text
How to Check Battery Health on Your Android Device?
Do you worry a lot about the well-being and potency of your smart device’s battery? Want to check the battery health of your smartphone or computer? Battery health plays a major role in the functioning of any smart device. The health of the battery on your device also determines how much of a charge it can hold and for how long. As your device gets old, the battery starts to degrade. And that is why you should keep track of the battery health on your device. Whether it’s an Android smartphone or a tablet, all the Android devices come with excellent battery backup. Also, if you want, you can easily change the battery health of your Android device. Do you know you can get information about the battery health of your Android device?
Are you also a user of any Android device and wish to know how to check battery health? If you wish to know about the battery health of your Android smart device, you will have to read this full post. Here, you will be provided with the method using which anyone will be able to check the battery health level on their Android smart device. So, please go through this full post.

Checking the Battery Health on an Android Device
Checking the battery health of an Android smartphone or tablet is a straightforward task for anyone. There are multiple methods that you can follow for this. Even though Android provides a lot of information regarding battery usage, but there is no straightforward way to check the battery degradation. Here, you will see the most straightforward method applying which you will be able to track the battery health of your Android device.
Some Android devices allow you to check the battery health using hidden menus. If you find no issues with the battery on your device, there is no need to worry about it. You will have to go through some simple steps to find out about the battery health of your Android device. So, it’s finally time to get straight to the technique.
Method to check the battery health of an Android device
Go through the steps to check the battery health of your Android smartphone or tablet:
To start with the method, first, you will swipe down from the top of the screen to bring the quick settings tiles.
From the notification panel, tap the gear icon at the top left corner of the screen to get to the Settings window.
After the Settings app opens on your screen, keep scrolling down to select the option of “Battery and Device Care.”
And when you get to the Additional Care section, you will have to select the option of “Diagnostics.”
Now, on your smart device, you will see a bunch of options for things on your screen.
You will have to tap the battery status icon to proceed further. You will now be able to see some information about the battery. And this is all you will need to do to check the battery health of your Android device.
So, this was all about getting the information on the battery health of an Android device. Make sure you follow the steps carefully. And please stay connected to us for further updates by visiting our official website.
Visit: Rollo.com/setup
Source:https://rolloprintersupdate.com/how-to-check-battery-health-on-your-android-device/
2 notes
·
View notes
Text
A Complete Guide on Fixing the “program not responding” Error on Windows 10
When you are trying to open any program on Windows 10, and after some time, it freezes, then suddenly the “Program Not Responding” appears on your screen. You cannot shut the screen in this situation and cannot use any options. Many users are complaining about this error and struggling to find its solutions. Here are some instructions provided below.
Update your Windows 10 to Fix the Programming Error on Windows 10
If you wish to update Windows 10 to resolve this error, you need to execute the effective solutions below:
Navigate to the Windows Search section on your PC.
Then input ‘windows update’ and select the OK button to launch the screen.
You should click on the ‘Automatic’ option through the drop-down menu of Startup Type, whether that is not already chosen.
Now, hit the Apply and then OK buttons to verify the fresh settings.

Perform System File Checker to Fix the Programming Error on Windows 10
If you are attempting to execute the system file checker but you can’t, try the directions given below:
Hold the Windows and X buttons simultaneously on the keyboard to invoke the Win + X menu.
Thereafter, insert ‘sfc /scannow’ and select the OK button to start the scan process.
This process takes a minimum of 15 minutes, and once finish the scan process, the Command Prompt screen might state, ‘Windows Resource Protection found corrupt files and successfully repaired them.’
Now, shut the Command Prompt, then reboot the Windows.
Run DISM Scan to Fix the Programming Error on Windows 10
If you perform a DISM scan on your device, check out the quick resolutions below:
Open the Command Prompt as administrator on the system.
Thereafter, insert the pursuing line and hit the Enter button: DISM /Online /Cleanup-Image /RestoreHealth.
Now, the DISM scan will begin. The scan takes a minimum of 20 minutes.
After completing the DISM scan, check whether the issue still shows.
End Windows Desktop Manager Task to Fix the Programming Error on Windows 10
If you would like to end the Windows Desktop Manager task, continue with the possible instructions below:
Hold the ‘Ctrl + Shift + Esc’ keys simultaneously on the keyboard to invoke the Task Manager.
Once the Task Manager launches, find the ‘Windows Desktop Manager process,’ right-click on it, then pick the End Task through the menu.
Make Changes to the Registry to Fix the Programming Error on Windows 10
If you are trying to make changes to the registry, go through the effective solutions stated below:
Hold the Windows and R buttons simultaneously on the keyboard to launch the Run section.
After that, input ‘regedit’ into it, select the OK button and hit the Enter key.
Navigate to the File option and then choose the Export option.
You should change ‘Export range’ to All.
Then input the preferred name of a file and select the button of Save.
Once you have done, you will have a backup of the registry ready
If anything goes incorrect after changing the registry, perform the backup file to restore the registry to the default state.
Select the Edit option and then go to the Find option.
Type ‘CoreParking’ or ‘54533251-82be-4824-96c1-47b60b740d00’ then select the Next button.
Now, remove the buttons associated with CoreParking.
Redo the 4th and 5th steps to locate each button associated with CoreParking and remove them.
Visit: mcafee.com/dellactivation
Source: https://mcafeedellactivation.co.uk/a-complete-guide-on-fixing-the-program-not-responding-error-on-windows-10/
2 notes
·
View notes
Text
A SIMPLE WAY TO TURN OFF AUTO-BRIGHTNESS ON IPHONE
The iPhone is one of the best products developed by Apple, a well-known multinational tech firm. Apple is known for designing various great smart gadgets, including iPhone, iPad, Mac computers, and smartwatches. All the smart devices of this tech firm work well to provide their users with the best experience. Using any of the Apple devices is simple for anyone. Also, within all the devices, the company provides its users with a lot of excellent features and options. If you already own an iPhone, iPad, or any Apple device, you might know all about them and the features that come within them. For instance, there is an option on iPhone and iPad that lets you adjust the brightness automatically. This is a great feature that helps users to save the battery on their iOS devices.
Even though the option to automatically adjust the brightness on an iOS device is useful, it uses sensors to adjust the display’s brightness automatically. But for some reason, you might want to turn it off. Do you know how you can turn off the auto-brightness on your iPhone? If you are a new user of this Apple device, you might not know how to do so. And if this is the situation, you must read this full blog.
Turning off auto-brightness on an iPhone
The option to adjust the brightness automatically makes it easier for the users to use their device in various situations without manually changing the settings. Also, the light sensors to adjust the display brightness helps to preserve your device’s battery. But, it’s completely fine if you wish to disable this functionality. There can be multiple reasons why you wish to turn off the auto-brightness on your iOS device. You might find it annoying when your device adjusts the brightness itself. You can turn off the auto-brightness on your iPhone without any difficulty. For this, you will have to go through your device’s settings page. Here we will show you two methods using which you can quickly disable the auto-brightness on your iOS device. So, it’s finally time to get started with the first method.
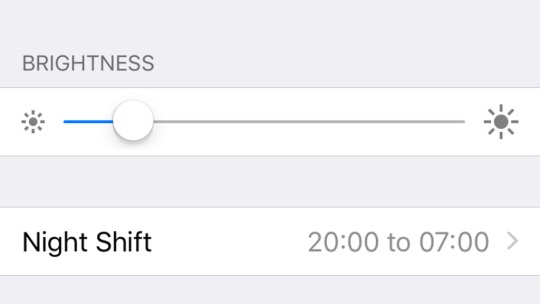
Instructions to turn off auto-brightness on an iPhone
Here’s how you can turn off the auto-brightness on your iOS device:
First, launch the Settings app on your iPhone. You can launch the app from your home screen.
After launching the Settings app, keep scrolling down through your screen and tap the option of “Display and Brightness.”
When you get to the Brightness section, turn off the toggle switch for the option of “True Tone.”
If at any time, you wish to enable True Tone, you will have to navigate to the same area in your device’s settings. And then, tap the toggle button for the option of “True Tone.”
The steps to adjust the brightness in the control center
You can also adjust the brightness on your device from the Control Center. Here’s how to do so:
If you are using the latest iPhone model with a recent iOS version, you will then open the control center by swiping down from the upper-right corner of the screen.
Tap the brightness adjuster icon that looks like a sun icon.
To make the screen brighter, you will have to slide up. And to make the screen dimmer, slide down.
So, this is how you can turn off the auto-brightness on your iOS device. And this is it for now. Try the procedure now if you also own an iPhone, and let us know if you face any difficulties.
Visit: mcafee login
Source:https://ellisinfotechpeoplehelps.wordpress.com/2022/01/06/a-simple-way-to-turn-off-auto-brightness-on-iphone/
1 note
·
View note
Text
HOW TO REMOVE PIN FROM YOUR WINDOWS 11 DEVICE
Windows 11 offers several login options to access your system with the PIN or fingerprint quickly. But some users want to remove the PIN on their Windows 11 systems and ask for some solutions to fix it. If you are also in the same situation, follow the complete method stated below.
Turn off Security Settings to Remove the PIN on Windows 11
If you are unable to turn off Security Settings, you require to pursue the whole procedure explained below:
First, press the Win and I hotkeys simultaneously over the keyboard.
Once you do that, choose the ‘Accounts’ option through the listed tabs inside the navigation panel.
Then, select the ‘Sign-in option’ tab over the right side of the screen.
Check whether the ‘For improved security, only allow Windows Hello sign-in for Microsoft accounts on this device (Recommended)’ section beneath the ‘Additional settings’ is turned on. Switch the toggle to turn it off.
You should shut the Settings application for the modifications to come into effect and later launch it again.
Go to the ‘Pin (Windows Hello)’ and press the ‘Remove’ button.
Thereafter, hit the Remove button.
Now, confirm the ‘Microsoft account password’ and press the OK button to delete the PIN.
Use ‘I forgot my Pin’ Option to Remove the Pin on Windows 11
If you don’t know how to use the ‘I forgot my Pin’ option, then proceed with the effective method stated below:
Reach the Sign-in options page and click on PIN (Windows Hello).
Afterward, select the ‘I forgot my PIN’ option.
You should click on the Continue button over the verification prompt to continue.
Thereafter, insert the ‘Microsoft account password’ for confirmation and select the Sign-in button.
Then, select the email address connected to the account to get a confirmation code.
Now, you need to insert the confirmation code you got and hit the Verify button.
Finally, ignore the two text columns and hit the Cancel button to delete the PIN on Windows 11.

Modify the PIN on Windows 11
If you are trying to modify the PIN on Windows 11, go through the whole procedure stated below:
First, you need to open the Windows Settings app by pressing the Win and I hotkeys over the keyboard.
You should choose the ‘Accounts’ option using the list of the tab in the left side’s navigation panel.
Go to the ‘Sign-in options’ over the right side.
Then, select the ‘PIN (Windows Hello)’ option.
Later, select the ‘Change PIN’ button.
Now, insert the old PIN in the first column and enter a new PIN in the next two columns, and now hit the OK button to apply the changes.
Change the Fingerprint to a Local Password on Windows 11
If you attempt to change fingerprint to a local password on Windows 11, execute the entire method stated below:
Launch the Settings app by holding the Win, and I buttons simultaneously over the keyboard.
After that, select the Accounts option using the vertical ellipsis menu.
After entering the Accounts menu, reach the right-hand side and choose the ‘Family & other users’ option.
Check whether you have any accounts beneath the ‘Other users’ section. In case you use any, delete any of them before going to another fix below.
Navigate to the root Accounts menu, select the ‘Your info’ option using the screen’s right side section.
Move down to the ‘Account Settings’ menu and select the ‘Sign in with a local account instead’ option.
You should select the Next button.
You will be requested to give the fingerprint recently tied to the MS account.
Afterward, insert the username, give a password for the local account, and set up a strong password if you ever forget it.
Lastly, change a local account by selecting the Sign-out and Finish button.
Visit: mcafee login
Source: https://ellisinfotechpeoplehelps.wordpress.com/2022/01/06/how-to-remove-pin-from-your-windows-11-device/
0 notes
Text
Tips to Fix Quick Tap and Other Not Working Features in Google Pixel 6
Undoubtedly, you may find Google Pixel 6 and 6 Pro with some exclusive features. However, saying they all work without any issues is quite thoughtful. From the customers’ reviews, the Quick tap is the primary Pixel 6′ feature; people are not finding it reliable and working correctly; however, other features may also compel you to fix them. It means, Pixel 6 and 6 Pro are loaded with some clever features, but you will also experience the problematic ones among them. Most of these feature issues resolve with software updates from time to time.
However, you can proactively fix these problems arising out of the Pixel 6 features by following this guide.
As you know, Google unveiled the Google 6 series in October 2021. During the launch of the Pixel Series, Google has confirmed many features to experience in the phones. Further, Google’s Tensor chip is the most interesting arguable feature addition. Apart from the Tensor chip, Pixel 6 borrows many similar features available within Android 12, and many of the features use Google’s AI smarts power.
The device has redesigned the on and off processing feature, but you may find them not working many times. Once set in, pixel 6’s Quick tap feature enables users to trigger a specific action by tapping twice on the back. But it does not sometimes work while using it; no matter how many times you tap it, the screenshots were not taken. It is found that restarting the phone quickly solves this issue. So, if you experience the same problem, consider restarting your phone.
Like Quick tap, restarting the phone can fix many other annoying issues you experience daily. Restarting Google’s phones is more fruitful than any other phone while fixing the problems is frustrating because of Google’s software reliability. So, if your Pixel 6 or 6 Pro devices are having some software problems, consider restarting them before you research issues and their solutions anywhere online.

The fingerprint sensor is another failure the users are experiencing where they experienced their fingerprint sensor fail permanently or not working when the phone’s battery dies. Google has also acknowledged the issue, but there is no known fix other than factory reset. It isn’t very reassuring, but you should consider it if you want to use the fingerprint sensor on your phone.
The next issue is randomly ghost dialing contacts, where you observe ghost dialing at some point of the day until you have Do Not Disturb enabled on your phone. To solve the issue, you can download the latest version of the Google app. Although, ensure the version you download is 12.43.18 or newer.
No 30 W charging is another aspect to look into as Google boasts a super 30W Pixel 6 charging; however, you do not get this much fast charging, and it aims to max 22W charging. There is no solution for this charging problem yet. It’s quite [possible there is some problem with the software limiting the charging.
Furthermore, some people are also complaining about the second hole punch in their displays. It’s the weirdest issue in the Pixel phone. There is only one hole for the front-facing camera; however, some of them have a second punch hole.
Finally, you can end most issues with restarting your phone as Google relies more on software than other smartphones. Updating software also works well and erasing brings back many functions to normality.
Visit: Rollo.com/setup
Source: https://globalsofthelp.wordpress.com/2021/12/06/tips-to-fix-quick-tap-and-other-not-working-features-in-google-pixel-6/
0 notes
Text
A Complete Guide to Disable Start up Sound on a Windows 11 PC
Microsoft has always worked to provide its customers with the best product and services. Recently, the tech giant has rolled out Windows 11, which is a major Windows update, including multiple excellent features and options. Windows 11 enables its users to easily perform any computing task on their devices. A majority of Windows users have already downloaded and installed this updated version of the operating system on their PCs and desktops. If you are also running Windows 11 OS on your device, you must have noticed some of the significant changes that it includes. For instance, the position of the Start Menu and taskbar has changed, and with that, the live tiles and Cortana have also been removed from the OS. While there are a lot of new things to explore in the recently updated Windows version, there are still some functionalities that remain the same.
For example, when you start your Windows computer, it makes a beautiful soothing start up sound. While most people like this sound, there can be some Windows users who might want to disable it on their devices. And fortunately, it is much straightforward for anyone to disable the startup sound on a Windows 11 PC. Are you also a user of a Windows 11 computer? Want to disable the startup tone on your device but don’t know how to do so? If this is the case, there is no need to go anywhere now. In the following post, you will be able to get the method following which you can easily disable the startup tone on your Windows 11 PC. So, make sure to go through this whole post to get every detail.
Disabling the startup sound on a Windows 11 PC
Any Windows 11 user can easily turn off the startup sound on their device. There are multiple methods that you can follow for this. You can turn off the start-up sounds by going to the Windows Settings, or you can do so via the Group Policy Editor. Here we have mentioned both of these methods that you can easily follow. So, it’s finally time to get to the first method now.
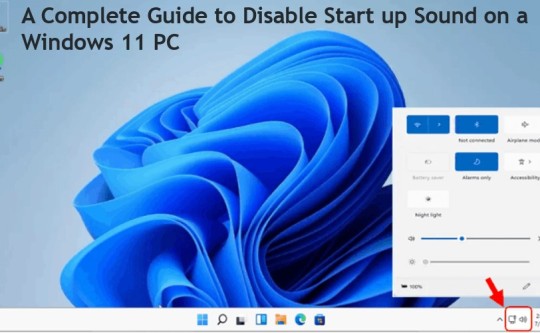
Method 1: Turning off start-up sounds via the Settings app on Windows 11
Follow the steps to disable the startup sounds on your Windows 11 computer using the Settings app:
To get started, you will first launch the Settings app on your Windows 11 device. To do so, you can use a keyboard shortcut, which is “Windows + I.”
Alternatively, you can go to the Settings screen by using the Windows search option.
And once you get to the main window, go to the left navigation panel and click on the “Personalization” category.
Next, you will have to come to the right side of the screen and scroll down to click the “Themes” tab.
After you get to the Themes section, you will click the Sounds option placed next to the system’s image.
When a pop-up appears on your screen, you will uncheck the box given next to the option of “Play Windows Start up Sounds.”
At last, click on the “Apply” option and then hit the “Ok” button to save the changes. And that’s it.
You have successfully turned off the startup tone on your Windows 11 computer.
Method 2: Instructions to turn off the startup tone using Local Group Policy Editor in Windows 11
One can also disable the startup sound on their Windows 11 computer via the Local Group Policy Editor tool. Here’s how this method works:
First of all, you will launch the Run window on your Windows 11 device. For this, you will press the “Windows + R” keys from your keyboard.
In the Run dialogue box, you will type “gpedit.msc” to launch the Group Policy Editor tool, and then use the enter key.
When the main window appears on your screen, you will go to “Computer Configuration>Administrative Templates>System>Logon.”
Next, you will double-click on the “Turn Off Windows Startup Sound to open the policy.”
After the next window shows up, choose the option of “Enabled.”
And at last, click on the “Apply” option and then save the changes by clicking on the “Ok” button. And that’s all you will have to do to disable the startup sounds on your Windows 11 PC.
So, these are the two methods that you can use to disable the startup sounds on your Windows 11 PC. Try any of the techniques right away and visit our official website to stay updated.
Visit: mcafee.com/dellactivation
Source:https://globalsofthelp.wordpress.com/2021/12/06/a-complete-guide-to-disable-start-up-sound-on-a-windows-11-pc/
0 notes
Text
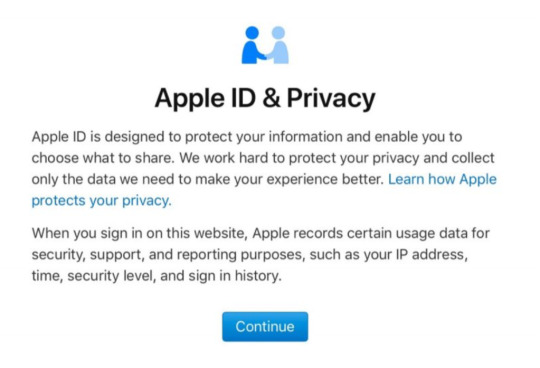
A Complete Guide to Apple’s New Data Privacy Portal
Apple is openly supportive of people’s security and privacy as it offers plenty of features that enhance privacy and the security of its users’ data. The CEO of Apple, Tim Cook, says that privacy is one of the essential human rights. On Apple’s data and online privacy platform, you can see what Apple has arranged for its users to safeguard their privacy and data. You could also access the portal to modify your details saved by Apple, including removing your Apple ID as well as your data associated with it. Users can also download a copy of their data reports.
How to Access the Data and Privacy Portal of Apple?
Follow the explained guidelines mentioned below to access the data and privacy portal of Apple:
If you wish to hold control over your private data or just want to know about what Apple has stored in their server about you, then do follow the steps mentioned down:
Open your web browser and then visit ‘privacy.apple.com’, and you will land directly on Apple’s Data and Privacy website platform.
Now sign in to your Apple account along with your Apple ID and your password.
If asked to type into a two-factor authentication code, press on Continue.
From there, you will be required to choose whether you wish to modify your private data saved by Apple, and in case you wish to delete your Apple ID and the data it contains, you can do so from there.
How to Change Your Account Details via Apple’s Data and Privacy Portal?
Follow the explained guidelines mentioned below to change the account details using Apple’s data and privacy portal:
On a web browser, go to ‘privacy.apple.com.’ Next, enter your account ID and password.
When prompted, type in the two-factor authentication code.
Tap on the Continue option.
Head to the Get Started option located below to the Correct Your Data heading.
Now, look at the sections to use and modify your Apple ID details and information related to the Apple Store transactions.
To manage and optimize your Apple ID account details, visit appleid.apple.com.
To manage the transaction of your Apple Store, shipping preferences, and billing details. You can also change details like the iPhone Upgrade Program and other things from there.
How to Delete Apple ID Account via Apple’s Data and Privacy Portal?
Follow the explained guidelines mentioned below to remove the Apple ID account using Apple’s data and privacy portal:
Head to privacy.apple.com and log in to your account.
Then, use the two authentication codes to complete the process.
Press on Continue to get in.
Next, navigate to Get started.
Examine the details related to the removal of your account.
Apple should now confirm your deletion requests and speak that the course might take seven days to finish.
Now obey Apple’s recommended prompts (like backing up user data and logging out of all devices.) prior to deleting the account.
Select a reason for account deletion by accessing the pull-down options.
Press on Continue.
Now, go through the details related to your account deletion once more.
Head to the Continue option.
Read the Terms and Conditions of the Deletion and tick the checkbox to verify that you have read and accepted the conditions.
Tap on Continue.
Select a contact mode, which would be for telling your account status updates.
Press on Continue.
Type or print the unique access code you got.
That could be used for confirming your identity in case you want to reach Apple Support.
The code will be used for canceling your process of account deletion.
Write down your access code to verify it is you.
Tap on Continue.
Go to the Delete account to remove your Apple ID account as well as your data in it.
Soon, Apple will begin the confirming procedure prior to removing your account.
The account would remain in life during the process of verification.
That can consume up to 7 days at max to get done.
Visit: mcafee.com/dellactivation
Source:https://globalsofthelp.wordpress.com/2021/12/03/a-complete-guide-to-apples-new-data-privacy-portal/
0 notes
Text
How can I unlock my iPad if I forgot the passcode?
In case you forget the password or passcode of your iPhone, you know how difficult it can be. Every image, contact, social media account, and many more are securely tucked away among that lock display, but you are unable to see any of them. If you want to reset your iPhone’s passcode or password, then here are some directions below.
Recover Forgotten Apple ID to Repair the iPad Password
If you face hurdles during recovering a forgotten Apple ID, carry out the steps in the same way as explained below:
First, visit ‘appleid.apple.com’ on your device.
Afterward, select the ‘Forgot Apple ID or password’ option.
You should input the email ID related to the Apple ID and select the Continue button.
Now, verify the contact number and hit on the Continue button.
Then Apple will share notifications to all devices that are logged in with the Apple ID.
Select the Allow or Show button according to the device you are utilizing, then pursue the steps to reset the password.
If you cannot use a different mobile, Mac, or iPhone, select the ‘Don’t have access to your devices?’ on the lower side of the Apple ID website.
The next screen gives extra choices to reset the password of Apple ID:
Reset the password while logging on to a new device.
Use ‘Find My iPhone’ on anyone else’s iOS device.
Use ‘Find My iPhone’ on an iOS device at an Apple Store.
Now, choose one of them to set up with the new password Apple ID.

Recover a Forgotten iPad Passcode
If you face hurdles during recovering a forgotten iPad passcode, carry out the steps in the same way as explained below:
Firstly, invoke the desired browser and visit http://www.icloud.com.
Then login to the iCloud once it is pop-up.
Click on the ‘Find iPhone’ option.
Once the map appears, select the ‘All Devices’ option and click on the iPad through the list.
Once you select the iPad name, you will get a new screen in the map’s corner.
This screen has three options: The last Mode, play Sound, and Erase iPad.
Now, select the ‘Erase iPad’ and pursue the steps. This will ask you to confirm the option.
Once you have done that, the iPad will reset.
The iPad will require to be connected to the internet and charged for this process.
Deal with the Lost Passcode via iTunes to Repair the iPad Password
If you face hurdles during dealing with the lost passcode using iTunes, carry out the steps in the same way as explained below:
First, link the iPad to the system you utilize to synchronize and boot iTunes.
iTunes synchronizes with the iPad and waits to complete the process, then selects the icon of Device.
You should select the ‘Restore iPad’ option.
Now, the system removes the iPad and sets up the fresh passcode once it reboots the iPad.
Access the iPad via Recovery Mode to Repair the iPad Password
If you face hurdles during accessing the iPad using recovery mode, carry out the steps in the same way as explained below:
Firstly, attach the iPad to the system via the cord that is offered with the iPad.
After that, launch iTunes.
Long press the Wake or Sleep key and home button over the iPad, then stay pressing once the Apple logo appears.
Once you view the iPad graphic linked to iTunes, leave the keys.
Then click on the ‘Restore’ button and pursue the instructions.
This process takes some time to restore the iPad, which turns off and on during the procedure. After rebooting, you are pop-up to configure the iPad like you did once you bought it.
Now, you should restore it from a backup during this procedure.
Visit: mcafee.com/activate
Source:https://globalsofthelp.wordpress.com/2021/12/03/how-can-i-unlock-my-ipad-if-i-forgot-the-passcode/
0 notes
Text
How to Add Multiple Accounts on your Apple TV

Now, Apple TV is used for classrooms, family rooms, and meeting rooms, etc. And you already know it is required to connect above one person. Which means it wants above one Apple ID. It is not simple & powerful like Mac, but it’s better than the iPad or iPhone. So, here are the steps to use multiple accounts on your Apple TV. Let’s get started.
Adding Multiple Accounts to Apple TV
To add multiple accounts to Apple TV, go through the following procedure stated below:
Go to the Settings app on your Apple TV and open it.
After that, you should select the Accounts option.
Then you have to choose the iTunes & App Store.
Thereafter, you should select Add new Apple ID.
When the Prompt comes, select Enter New.
Later, you should input the extra Apple ID username.
Now, select Continue.
After that, you should type the secondary Apple ID password.
Then you have to Log In.
Move Between Multiple Accounts on Apple TV
To move between multiple accounts on Apple TV, go through the following procedure stated below:
Get started by opening Settings on your Apple TV.
After that, you should select Accounts.
Then you have to choose the iTunes & App Store.
Now, you should select the account you would like to use.
Using Control Center to Move Between Users on TvOS 13 to Add Multiple Accounts on Apple TV
To use the control center to move between users on TvOS13, go through the following procedure stated below:
To get started, press the Home/TV button firmly on your Siri remote.
After that, navigate to the Control Center & switch users at the upper right-hand side of the screen of Apple TV.
Move the Apple TV to Sleep Using Control Center to Add Multiple Accounts on Apple TV
To move the Apple TV to sleep using the control center, go through the following procedure stated below:
To begin with, press firmly the Home/TV button on your Siri remote to bring up the Control Center on Apple TV.
After that, you should choose Sleep.
Modify the Apple TV’s Audio Destination with Control Center to Add Multiple Accounts on Apple TV
To modify the Apple TV’s audio destination with the control center, go through the following procedure stated below:
First, you have to go to the Siri remote & press firmly the Home/TV to bring up the Control Center on Apple TV.
After that, you should choose the Audio icon.
Then you have to move down and then select the new audio selection.
Browse with Control Center on Apple TV to Add Multiple Accounts on Apple TV
To browse with the control center on Apple TV, go through the following procedure stated below:
First & foremost, navigate to the Siri remote & press firmly the Home/TV button to bring up the Control Center on Apple TV.
After that, you should choose the Search icon.
Now, enter or use Siri to browse.
Visit: mcafee.com/activate
Source:https://globalsofthelp.wordpress.com/2021/12/03/how-to-add-multiple-accounts-on-your-apple-tv/
0 notes
Text
Tips to Resolve Snapchat Not Working Issue
Most Snapchat users around the world are facing problems while sending and receiving Snaps around 12:30 AM ET. DownDetector found the issues related to Snapchat and further blamed them on its services, as mentioned above. Is Snapchat working for you? If it’s not working for you, here are some tips you can apply to fix it. The ways and guidance to solve the Snapchat-related problems may vary if you use a Pixel 4a that runs on Android 11 and Snapchat Android app version 11.44.0.37.
Follow this simple guide to fix any problem related to Snapchat issues.
How to check that Snapchat is not working for you
You can use some super tools to check whether Snapchat is down for you or everyone. DownDetector is a reliable website that can fit all kinds of services and for all places. To do so, you can go to the Downdetector Snapchat page to find whether it is down or not. Further, you can Live Outage Map to check the Snapchat down for a particular area.
You can also use the official Snapchat Twitter support account to update you with any Snapchat outages and how long they will take to recover.
The simple ways to the Snapchat issues
When you find that Snapchat is not working correctly, you can follow the below-mentioned simple steps to fix these issues.
Restart your phone
Restarting the phone may solve many unknown tech problems, and the same logic applies to Snapchat as well. When you follow this trick, you may resolve Snapchat not working instantly. However, if it doesn’t work, you should move to applying other tricks. Not only for Snapchat issues, but this trick also works for most tech problems on your device.
Reinstall Snapchat app
First, you uninstall your Snapchat app from your device and then install it again from Google Play Store. This trick can also bring your Snapchat to normal functioning. Before you uninstall the app, you can consider closing or logging out of the Snapchat app. Most probably, this trick resyncs your local Snaps with the server and fix the issue.

Check Internet Connection
Some users are also facing problems in sending and receiving Snaps, or while loading Snapchat, there might be internet issues. You can check it by opening other internet-based apps on your device. If nothing else works for you, it may have some internet issues. You can try the internet connection using both mobile data and Wi-Fi.
Sometimes Snapchat stops working if it detects a VPN or any third-party apps on your device. So, it starts working if you consider disabling VPNs or any third-party app on your mobile while you are on the Snapchat app.
Check for the Snapchat app update.
You may face problems with the Snapchat app if you are using an old version. Your Snapchat may stop working/responding if there is a significant app update. To check for an update, go to the Google Play store and check if any update is available or not. If you find it there, download it, and most probably, the update can resolve the issue.
Visit: mcafee.com/activate
Source: https://globalsofthelp.wordpress.com/2021/12/02/tips-to-resolve-snapchat-not-working-issue/
0 notes
Text
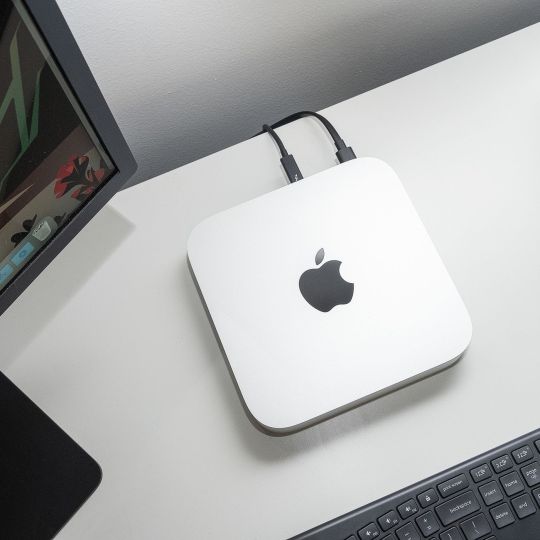
Top Reasons to Buy Apple MacBook M1 Pro
You can purchase the new 14 and 16-inch Macbook M1 Pro laptops. The MacBook M1 Pro has a processor that represents a new pathway for these laptops. The laptops have exceptional performance, durable battery life, and a bright display. These improvements are worth pointing out. Here are a few reasons to upgrade or purchase a new MacBook M1 Pro laptop.
LED Display
The Liquid Retina XDR display provides vibrant, sharp, and clear images. The colors feel like popping off the screen during a 4K HDR movie. The display also offers a 120 Hz refresh rate. As a result, you will also get smooth action scenes during the movie night.
The LED screen emits up to 1600 nits which are also quite bright. The maximum brightness is up to 1600 nits. It also provides better graphic-intensive tasks.
Ports
It has every kind of port that you want to use in the MacBook M1 Pro. Previous MacBooks only had USB-C ports. You will also get the MagSafe charging port. It attaches the charging cord magnetically.
The MacBook M1 Pro laptop also has three thunderbolt ports, a headphone jack, an SD card reader, and an HDMI port. The SD card reader is essential to transfer photos.
Performance
It acts like a beast when you talk about the performance. You can perform multitasking without any lag. The AAA titles games run smoothly. You can get up to 32 GB of RAM in the 14-inch Macbook M1 Pro device.
The multi-core performance provides the best score during benchmark testing. The laptop is a sure winner in terms of performance. It is faster than the Intel processors and offers a much better battery life.
The laptop also offers more RAM and Storage. It has new SSD models, and the SSDs are two times faster than the previous generation. You will also get up to 7.4 GB/s read speed.
Webcam
Meeting and video conferencing became an essential tool for working professionals. The new MacBook M1 Pro comes with a 1080p camera setup. You will also get clear and bright images with more details.
The 1080p webcam will provide the best look during chat and work meetings.
Battery Life
The 14-inch MacBook M1 Pro laptop provides an impressive battery life. It would help if you had a long-lasting laptop to work from home. It can offer you 12 to 14 hours of battery life if you work on a web browser. The battery life in the MacBook M1 Pro is also enough for an entire day.
Other Reasons to buy the MacBook M1 Pro:
There are several other reasons to purchase the MacBook M1 Pro:
Upgraded Keyboard.
Better Audio Output.
Great Form Factor.
Fast Charging Support.
Connectivity Ports.
Powerful Processors.
Increased Storage and RAM options.
Conclusion
MacBook M1 Pro is a next-generation laptop from Apple. It also includes a vibrant display, thinner bezels, fast performance, and more. If you are willing to expanse money, getting a working laptop with serious performance is the best option.
Visit: webroot.com/safe
Source: https://offers1webroot.com/blog/top-reasons-to-buy-apple-macbook-m1-pro
0 notes
Video
youtube
Norton has been making antivirus software since 1990, which makes it over two decades old. And if an antivirus brand is running successfully for that long time, it only means that it offers satisfactory solutions. Norton.com/setup is the official website of Norton for helping users set up their Norton products. Anyone can visit this link to download, install and activate his subscribed Norton antivirus. Visit: https://nort0n1.com/
0 notes
Video
youtube
With the emergence of technology, cybercrime is also emerging at a fast pace. To tackle it, McAfee is one of the very few solutions which is actually offering what it requires to take down the hackers in 2021. To protect my devices, I had to download, install and activate McAfee via mcafee.com/activate. Anyone can visit this link and enjoy the best security service available on the Internet today. Visit: https://mcafle.com/
0 notes
Text
The Best Quality Car Chargers for You 2021
A car charger is an electronic device that draws power from the car or vehicles’ battery. It becomes necessary when you spend the most time on the road; a car charger differs in shape and size from the regular phone chargers that allow you to charge one or multiple devices simultaneously. Here’s a list of our top car charger recommendations.
Amazon basic USB-C
Amazon’s basic USB-C charger is one of the most affordable car chargers. It is suitable with both USB-A and USB-C ports; both wired and wireless forms are also available in the market. Furthermore, USB-A is for low charging of 12W, and USB-C manages a bit higher of 18 W makes it compatible with most vehicles. If it is without a charging cable, you should buy a charging cable to complete the setup.
Anker Roav T2
Anker Roav t2 is a super-fast iQ car charger that also adapts Bluetooth allowing your device to connect with the car’s media. In addition, you can run FM on it with its automatic station finding capabilities; overall, it’s a charger with many capacities such as rapid charging, Bluetooth adaptability, radio stations, and powerful shape.
Aukey Wireless car charger
Aukey Wireless 10W fast car charger uses wireless charging technology. You can buy this perfect wireless car charger if your device supports wireless charging. Its electromagnetic sensor detects when you put your device into the slot, and it closes the grip.

In addition, Aukey wireless charging technology power up your devices without plugging them into an outlet. Moreover, it is pretty reliable and safe; further, you can check the battery level by pressing the power button during the device charging.
Scosche MagicMount Charge3
Scosche car charger is a wireless Magic Mount charger as it doesn’t grip your device, unlike other wireless chargers that can scuff phones leather cases. It is pretty different from the way it attaches to your device as instead of sticking your device into the cradle; it sticks with a small magnet that your phone’s back has. Scosche keeps your device charging sticking with your phone’s backside.
ESR HaloLock Wireless car charger
This HaloLock wireless charger is compatible with iPhone 12 series as it’s the first option that works with Apple’s technology called “MagSafe’. MagSafe is the latest technology available in the latest iPhones, which use its built-in magnets to stick with compatible accessories. Therefore, in phones, there is no need to attach an adhesive magnet on the backside of the phones. Moreover, it supplies 7.5-Watt power lower than the MagSafe charger of 15-Watt power range. However, it’s the only MagSafe charger in the market, so it is good to bag it this time.
Visit: norton.com/setup
Source: https://nort0n1.com/blog/the-best-quality-car-chargers-for-you-2021
0 notes
Text
Best Shooting Games for Android 2021
From a wide variety of games, shooting games are among the top best Android games. There are single-player and multiplayer Android shooting games for you. The shooting games demand quick actions from the players, which are not seen in other games. Since shooting requires high precision, it is pretty challenging to play these games on the touch screen. Shooting games are further categorized into first, third person, or multi-person shooting games. No matter the types of shooting games, we have covered the best Android shooting games for you.
So, without further delay, we start our top reviewed free and premium games.
Air Attack 2
Air Attack 2 is a sequel to award-winning air combat shooting games. It is full of stunning 3D graphics and provides you with simple controls; those who like extra challenges can go into survival mission mode. Furthermore, it includes five airplanes, rewards, and good Android TV support. It is one of the best Android shooting games available for free download for Windows and Mac. Finally, it was released in mid-2021 and is quite suitable for experiencing this game.
Call of Duty
Call of Duty is an online Android shooting game and is the king of shooting games currently. It keeps the games engaging with multiple game modes. Many customization options make it insanely popular. Many game modes engage the gamers like deathmatch, retrieval, search and destroy, etc. moreover, “Ground War,” a new mode, features more than 100 players. Overall, the game is relatively safe and good if you leave some occasional bugs.

Fortnite
Fortnite is a free-to-download multiplayer game where you kill all your opponents to be the last standing on the ground. In addition, it has so many controls that make it a little clunky on mobile; however, you can expect to see improvement in the coming days. Moreover, you can download it from the Epic games app. When you play it, you keep winning V-Bucks, an in-game currency to purchase items; everyone above 13 years of age can play this game.
Garena Free Fire
Garena Free Fire is a multiplayer battle royale third-person shooter game developed and published by Garena. It is one of the best shooting games where you battle to become the last survivor. In addition, you drop into a remote island with 49 other players, all of the players choose a safe place to stay survived for 10 minutes. The players can drive vehicles to explore the vast island, become invisible by lying under grass, and survive until the game ends. Finally, it is a thrilling game that excites you all the time.
Modern Combat 5
Modern Combat 5 has five customizable classes, the single and multiplayer game. Here you level up and activate the class-specific skills with skill points. It also has a squad chat to talk with other players. This FPS game with great graphics, powered guns, and multiplayer action entertains you the way you want.
Visit: mcafee.com/activate
Source: https://mcafle.com/blog/best-shooting-games-for-android-2021
0 notes
Text
norton.com/setup
Check the genuine ratings and honest reviews to know the reliability of a company and business. Reach norton.com/setup now. The site contains reliable reviews to help people choose the right company and business. Check the genuine ratings and trusted reviews of various companies.

0 notes
Text
mcafee.com/activate
Are you someone who likes to check the ratings and reviews of a business or company before connecting with it? If yes, then mcafee.com/activate is for you. It has real reviews from real people, which makes it a trusted site. Explore various categories of companies and review the top-rated businesses easily. Also, there is an option to search for specific companies so that you can check their ratings and honest reviews.

0 notes